Equipment in Fablab

Equipment
Here you will find a list of the equipment that can be found at Copenhagen Fablab, Værkstedshallerne.
You can use the Fablab's equipment and tools for free. You can buy materials in Fablab Værkstedshallerne.
In our material price list you can see all materials available.
On this page you will find a list of our equipment available for use at Værkstedshallerne, as well as a description of what they can be used for and how to use them. You can always ask the SuperUsers for help, if you are new or just unsure how a specific machine works. It's always better to ask for help once too much.
Keep an eye out for our events to see when the SuperUsers hosts the next Open Lab, where they are ready to help you. Sometimes they also hosts workshops in specific machines
You can find various files and guides on GitHub File Share.
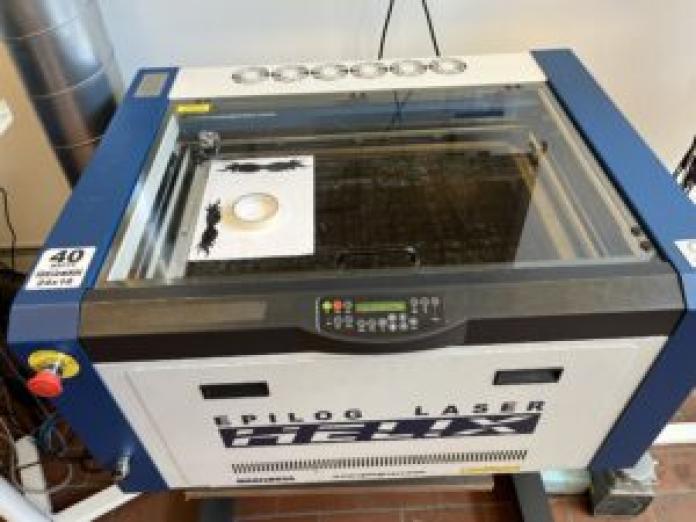
Epilog Helix Laser Cutter
Expand all
Practical information
The Laser Cutter can cut and ingrave in both tree, cardboard, acrylic and gives you infinite possibilities to make cut-outs in both 2D and 3D. The laser is extremely precise and can cut out even the most detailed motives and pictures.
We have two Epilog Helix (40 Watts) laser cutters.
Queue Culture: If there is a long line of people waiting to use the laser cutter, you can cut 1 plate (max 460 x 610 mm) / max 15 minutes per turn.
Details:
- Dimension: 610x460mm
- Max cutting thickness depends on the material. E.g. acryllic max 10 mm, HDF max. 5-6 mm, plywood max. 4-5 mm
- Your material needs to be as flat as possible
- Programmes: Inkscape, Illustrator or other vector-drawing programmes that can export an pdf.
- Format: pdf
Links good to know:
Materials
- Acrylic of the type PMMA
- POM
- MDF/HDF
- Mylar
- Llywood
- Balsa wood
- Cardboard
- Fabric
- Paper
- and more, ask the superusers
Skær aldrig i:
- PEHD
- Neoprene
- Polystyrene etc.
Guide
Prepare file
- Software: Inkscape (free), Illustrator or similar programs for vector graphics.
- Bring your cutting files on an USB-key or the like.
- File settings: Paper size: 600 x 400 mm (laser cutter dimensions: 610 x 460mm)
- Cut: no fill, solid color, line width 0.02 mm
- Engraving: filled areas and lines 0.2 mm and thicker.
- Double check the lines for cutting! Width 0.02 mm!
- Maximum cutting thickness depends on the material acrylic 10 mm, HDF max. ca 5mm, plywood max. 4-5 mm
- Save as PDF
- Whenever you can, instead of raster engraving try vector engraving – it is much faster!
Prepare Laser Cutter
- Remove dirt and material pieces in the honeycomb grid and inside the machine – THESE CAN CAUSE A FIRE!
- TURN ON THE FUME EXTRACTOR (Find the switch in the small hallway between laser and woodshop)
- Turn on the GREY MOTOR placed on the floor next to the right laser
- Your material should be as flat as possible
Adjust the height of the laser cutter
Do this every time you change material
- Press FOCUS
- Take the MANUAL FOCUS TOOL and put it on the carriage pins
- Press UP or DOWN until the tool tip touches the surface of your material
- Remove the MANUAL FOCUS TOOL and put it back where you found it
- Press RESET (whenever you press RESET it shows the current HOME position and the JOB list of files
Adjust the Home Position if neccessary
(Home is the top left corner of the canvas in your file)
- Press POINTER to turn on the red LED dot that shows where the laser will hit
- Press X/Y OFF
- Press GO
- Move laser head with your hand to desired position (avoid touching mirror and lens)
- Press SET HOME to lock
- Press RESET to see the JOB list
Cut & Engrave
- Open the PDF in Adobe. Print the file with the laser cutter’s printer driver “Epilog Engraver”
- Print in “Actual size”, orientation = “Auto”
- Adjust the settings for vector/raster. In “advanced settings” you can find pre-defined settings for specific materials. Also look at the samples we have in the fablab.
- Select PRINT to send the file to the laser. If the file name does not appear in the laser cutter’s display, try moving the laser cutter’s USB to a different port of the computer.
- It is always a good advice to make a test to check that the selected settings will cut/engrave as expected.
- When you see your file name and the FUME EXTRACTOR is working – press GO (green button) to start
- Important: You have to stay in the room to observe the laser cutter when it is running!
Close down
- Turn off the laser cutter
- Turn off the GREY MOTOR next to the right laser
- Turn off the FUME EXTRACTOR
- Remove dirt and material pieces in the honeycomb grid and inside the machine